A few months ago, we were approached to help turn a client’s vision into reality. Supporting local small businesses is at the heart of what we do, and we were thrilled to be part of this project from the very beginning.
The Design Process
The customer provided an Illustrator sketch, which made the initial file import into our CNC software straightforward. We accept a wide range of file types—from JPGs and PDFs to hand-drawn sketches—so getting started was easy.
However, upon closer inspection, we realized the file wasn’t vector-based, resulting in jagged, stepped lines instead of smooth splines. While we can sometimes work with stepped edges if the final product allows, this approach has two key drawbacks:
- The finished edges aren’t perfectly smooth to the touch.
- Cutting speed is affected, as the machine must constantly accelerate and decelerate between short straight segments rather than maintaining a steady pace.
To ensure both efficiency and a high-quality finish, we redrew the design using smooth splines.
Preparing for Manufacture
Next came nesting—the process of arranging parts on the material sheet to minimize waste. Automated nesting usually works well, but due to the project’s complex shapes, we manually adjusted the layout. This extra effort allowed us to fit an additional piece from the same stock, reducing material waste significantly.
We also recommended a custom-sized stock material for future orders to further optimize usage. In the end, only about 5% of the material was lost as scrap—an exceptional result for such intricate cuts.
Cutting: Precision & Efficiency
To maximize material savings, we chose a thin cutter over a faster roughing bit. While the roughing bit would’ve cut about 5x quicker, it would have required more material. Our simulations confirmed that prioritizing material efficiency would lead to greater overall cost savings for the customer.
Given the tight tolerances between the parts and offcuts, tab placement was critical. We used larger-than-usual tabs to ensure stability during cutting, knowing they’d be automatically removed in the edge-routing stage. (Normally, we’d optimize tabs for manual removal—smaller and more numerous—but this approach better suited the project’s needs.)
Finishing Touches
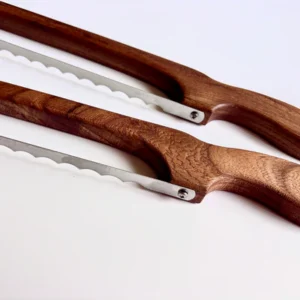
After cutting, the pieces were removed easily and required only minimal finishing: light manual routing and sanding. We added a rounded edge profile using a handheld trimmer—a task that could have been done via CNC but was more efficient as a manual step.
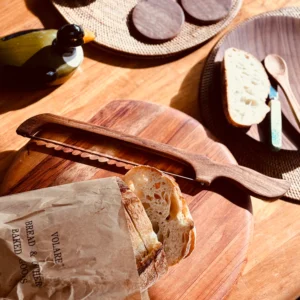
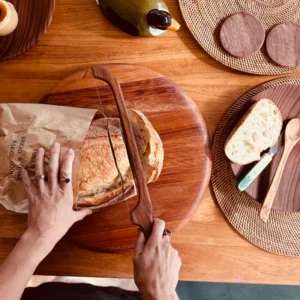
The final steps—fine sanding, oiling, and adding the knife blade—were handled by the customer, completing this custom-made product.
Watch the process in the video below.